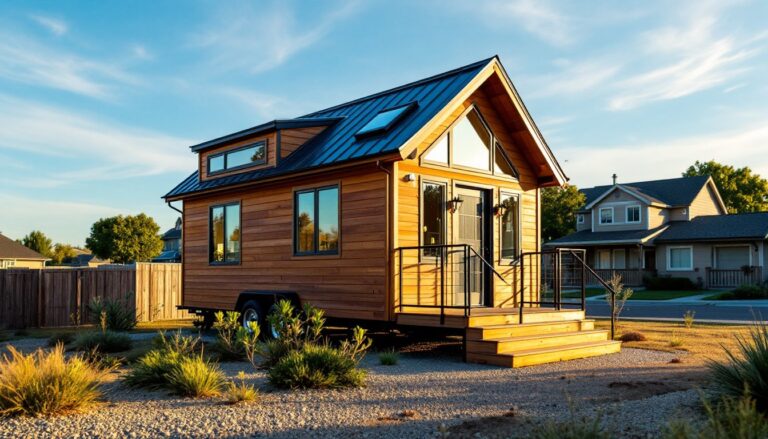
Tiny house blueprints have moved beyond the novelty stage, they’re now a practical solution for homeowners seeking affordability, sustainability, and intentional living. Whether you’re building a primary residence, guest cottage, or investment property, a solid blueprint is the foundation that separates a well-designed micro home from a cramped box on wheels. The right design accounts for building codes, traffic flow, natural light, and storage long before the first nail is driven. This guide walks you through what a tiny house blueprint includes, which layouts work best, and where to find or customize plans that fit your vision and local regulations.
Table of Contents
ToggleKey Takeaways
- A tiny house blueprint is a complete set of architectural drawings that ensures code compliance, prevents costly rework, and increases resale value and insurance eligibility.
- Efficient tiny house designs rely on three core principles: zoning (separating activities), verticality (maximizing wall and ceiling storage), and flexibility (multi-functional furniture and spaces).
- Professional tiny house blueprints should include site/foundation plans, floor plans, elevations, sections, electrical layouts, plumbing plans, and framing details that a builder needs for permitting and construction.
- Built-in cabinetry, vertical wall storage, and dual-purpose furniture are essential for maximizing limited square footage without relying on freestanding items that consume floor space.
- Budget 10–15% of your total build cost for design and permitting—typically $6,000–$9,000 on a $60,000 project—and work with a licensed architect or engineer to customize plans for your local climate and building codes.
- Popular tiny house layouts include open-concept living (maximizing visual space), loft bedrooms (saving square footage), dual-bedroom designs (for families), and kitchen-forward arrangements (optimizing utility efficiency).
What Is a Tiny House Blueprint and Why It Matters
A tiny house blueprint is a complete set of architectural and engineering drawings that specify every structural element, utility placement, and material requirement for a compact home, typically under 400 square feet on a permanent foundation or 200–300 square feet on a trailer. Unlike a simple sketch or floor plan, a full blueprint includes elevation views, cross-sections, electrical layouts, plumbing routes, and framing details that a builder (or DIY owner-builder) needs to pull permits and construct safely.
Why does this matter? Tiny houses operate under the same building codes as full-size homes, they must meet electrical, plumbing, fire, and structural standards. A professional blueprint catches code violations before construction, saving you thousands in rework. It also forces you to plan for real-world constraints: a 20×20 footprint sounds fine until you realize you need to fit two bedrooms, a bathroom, kitchen, living area, and HVAC equipment without creating a hallway maze.
A solid blueprint documents load-bearing walls (which can’t be moved), ceiling heights (often 8 feet, sometimes 8.5 in lofts), and utility runs, details that seemed theoretical until you’re staring at a framing crew waiting for clarification. Professional blueprints also increase resale value and insurance eligibility, since appraisers and underwriters want documented compliance, not a handshake agreement.
Key Design Principles for Efficient Tiny House Layouts
Efficient tiny house design hinges on three principles: zoning, verticality, and flexibility.
Zoning means separating activities into distinct areas. A sleeping loft above the living zone uses dead vertical space: a bathroom tucked at the edge of the kitchen allows plumbing to run through one wall: a small mudroom buffer between the front door and living space contains mess and reduces air loss. When zones blur (like a bedroom off the kitchen with only a curtain), the space feels cramped and utilities become costly to run.
Verticality is your secret weapon. Shelving above windows, storage under stairs, kitchen cabinets that reach the ceiling (9 or 10 feet), and mezzanine beds all add functional area without expanding the footprint. Standard 8-foot ceilings feel slightly cramped in 120 square feet: vaulted or cathedral ceilings in the living zone create visual relief and air circulation. A 10-foot-wide by 25-foot-long rectangle feels more livable than a 15-by-16 square, because longer sight lines make the space feel larger.
Flexibility means designing elements that serve multiple functions. A kitchen island is a counter, storage, and a stool-backed eating spot. A Murphy bed or sofa bed converts a home office into a guest bedroom. Pocket doors and barn doors save the 4–5 feet of swing space that hinged doors eat up.
Maximizing Space With Smart Storage Solutions
Storage is where tiny houses succeed or fail. Every cubic inch counts, so think vertically and behind-the-scenes.
Built-in cabinetry beats freestanding furniture, it uses wall space efficiently and doesn’t eat floor area. Upper cabinets above counters, a walk-in pantry along a hallway, and under-stair storage are industry standards. Toe-kick drawers (shallow pulls between the baseboard and cabinet face) hold utensils or small tools. Open shelving works in small spaces if styled carefully: a single misplaced item makes the whole area look cluttered.
Vertical wall storage, pegboards, magnetic strips, or shallow shelves, keeps everyday items within reach without piling them on countertops. In a 8-by-10 bedroom, wall-mounted nightstands and shelves save the floor space a traditional dresser would claim.
Under-floor storage is common in tiny houses on trailers, where hollow framing beneath the deck becomes an insulated pass-through for seasonal gear. On a slab foundation, look for a small shed or detached storage, owners often budget $2,000–$5,000 for a 4×8 ft lean-to.
Dual-purpose furniture is non-negotiable: an ottoman with interior storage, a bed with drawers underneath, a console that doubles as a plant stand and mail drop. Mass-market retailers and custom carpenters both offer these, though custom work runs $800–$2,500 per piece.
Popular Tiny House Blueprint Styles and Floor Plans
Tiny house blueprints come in a few proven layouts, each with trade-offs.
Open-concept living dominates the tiny house world: one large room combines kitchen, dining, and living, with the bedroom and bathroom in separate zones. This maximizes visual space and allows one heating zone, reducing utility costs. The downside is cooking smells waft everywhere, and a guest in the bedroom hears everything from the kitchen. Open layouts also need flexible furniture (a sofa back that doubles as a room divider, for instance) to create psychological separation.
Loft bedrooms are standard in 12×24 and 16×40 trailers. A sleeping loft sits 8–10 feet up, above the kitchen or living area, accessed by stairs or a ladder. They save square footage but feel claustrophobic if the ceiling height is under 5 feet, and they create heat stratification (hot air rises, so lofts are warmer in winter, harder to cool in summer). Ventilation and insulation matter here.
Dual-bedroom layouts squeeze two small bedrooms into roughly 300 square feet. One is often under 80 square feet (enough for a twin or full bed, a small nightstand, and a closet). These layouts appeal to families or remote workers needing separate offices, but they sacrifice living room space and force hallways, which eat area.
Kitchen-forward designs place the kitchen at the center, between the living and sleeping zones, maximizing counter perimeter and utility efficiency. Plumbing runs centrally, lowering costs and simplifying connections.
Professional tiny house designers often start with either 200-sq-ft “sleep-work” models (bedroom + office loft, minimal living space) or 300-sq-ft “full-service” homes (two zones, full kitchen, standard bathroom). The footprint (usually 8×20 to 16×40 on trailers, or 20×20 to 24×30 on permanent foundations) dictates what’s possible.
Essential Elements Every Tiny House Blueprint Should Include
A complete tiny house blueprint contains the following components:
Site/Foundation Plan shows the footprint, setbacks from property lines, utility access points, and drainage. On a slab, it notes reinforcement and gravel base. On trailers, it specifies axle placement and hitch type.
Floor Plan (top-down view) shows walls, doors, windows, appliances, and fixtures. It should include dimensions for each room and a total square-footage callout. Scale is typically 1/4″ = 1′ (one-quarter inch on paper equals one real foot).
Elevations (front, back, left, right views) show exterior finish, roof pitch, window placement, and siding material. They confirm visual balance and code compliance (minimum ceiling heights, roof overhangs).
Sections (vertical slices through the house) reveal framing details, loft height, insulation thickness, and how the roof attaches. A cross-section from front to back and side to side is standard.
Electrical Plan maps outlet locations, light fixtures, switch placement, and the panel location. Tiny houses often run 100-amp service (vs. 200-amp in larger homes), so the plan must account for simultaneous loads, you can’t run the oven, water heater, and AC all at once.
Plumbing Plan shows drain and supply lines, water heater placement, and vent stack routing. In a tiny house, every inch counts: a 3-foot vertical vent stack is common, but it must still comply with code clearances and slope requirements (typically 1/4″ drop per foot of horizontal run).
Framing Plan (for advanced DIYers) includes stud spacing (16″ on center is standard), header sizes, and load-bearing wall locations. This is where structural engineers earn their fee, they calculate live loads (occupants, furniture) and wind/snow loads for your region.
Utility Details spell out HVAC sizing (a tiny house often needs a 3–4 ton mini-split instead of a central system), water heater capacity (30–40 gallon is typical), and backup generator placement if off-grid.
Where to Find and Customize Tiny House Blueprints
You have four main routes: purchase plans from a designer, hire an architect, work with a kit company, or buy from a online marketplace.
Specialist designers like Tiny Home Design, Humble Homes, and Wind River Tiny Homes sell PDF blueprints for $500–$2,000. These are pre-engineered for common trailer sizes and regions: they’re not stamp-sealed by a PE, but they’re vetted and often include a basic builder’s guide. You’ll need a local engineer to review and sign off before permitting.
Architects and engineers cost $3,000–$10,000+ and are essential if your site is unusual (sloped terrain, high winds, flood zone) or local codes are strict. They tailor everything to your jurisdiction and take liability. Many states require licensed PE stamps for any permanent foundation structure.
Kit companies (Blokable, Dvele, Bluhomes) pre-design tiny homes and sometimes bundle delivery and assembly, your blueprint is essentially the assembly manual. Costs run $50,000–$150,000 delivered and partially finished. You lose customization but gain speed and warranties.
Online marketplaces like Etsy, Tiny House Plan, and Apartment Therapy have designers selling $300–$1,500 plans. Quality varies wildly: always check reviews, ask if the designer is licensed, and confirm the plan covers your region’s wind/snow loads.
When customizing, prioritize these changes: orientation (sun angle affects heating/cooling costs), door and window placement (curb appeal, privacy, daylight), bedroom/bathroom count, and kitchen layout. Avoid tweaking framing (walls, headers) unless an engineer approves, that’s where costly mistakes happen.
Budget roughly 10–15% of total build cost for design and permitting. A $60,000 tiny house project might spend $6,000–$9,000 on plans, engineer review, and permits. Skimping here invites code violations, financing delays, and insurance headaches.
Conclusion
A tiny house blueprint transforms ambition into buildable reality. It nails down the details that separate a cozy, compliant micro home from a code-violating disaster. Start by identifying your must-haves (one or two bedrooms, office space, etc.), your site constraints (permanent foundation vs. trailer, climate zone), and your budget. Then shop blueprints from reputable designers, have a local engineer or architect review them, and factor in 10–15% of your total build for design and permits. The upfront investment in a solid plan pays back in faster construction, insurance eligibility, and a home that actually works at tiny scale.